Audience: Accounting Manager
Accounting Systems: NetSuite, QuickBooks Online, MineralTree File Connect
Summary: Reviews how to apply and manage credits in MineralTree after creating credits in your Accounting System.
The article covers the following topics:
- Create Credits in Accounting System
- Apply Credits in MineralTree
- Review Credits in MineralTree
- When Remaining Balance Is Greater Than $0
-
When Credits Make Your Invoice $0
Create Credits in Accounting System
The first thing you need to do is create the credit in your Accounting System.
For File Connect, first refer to Credit Application for File Connect. You must configure your credit import file.
Once credits are in the Accounting System, they will become available in MineralTree on the next sync cycle (or with File Connect, on the next credit file you import).
Apply Credits in MineralTree
You can apply credits by navigating to the Invoices tab and clicking on the Credits button.
Once in Apply Credits page of MineralTree, you'll be able to see all the credits available for use, sorted by vendor. Click Select to choose the credit you wish to apply.
Note: If you don't have any invoices posted to a vendor for which you have a credit, the credit will not appear on the Apply Credits page.
Once you select a credit, you'll be able to see a list of all of available invoices to which that credit can be applied.
Note: Credits can only be applied to posted invoices. If you ever create credits in your Accounting System and you do not see the invoice to which you wish to apply in the credit application area, it might be because invoices are not posted for that vendor.
To be sure that credits have synced over you can always check the Search tab.
When you select an invoice, you'll be able to see available credits, credit amount, and credit creation date.
To apply a credit, type in the credit amount you want to apply to the invoice. You can use credits partially or in full. As you apply credit amounts, MineralTree will update Total Credits Available at the top of the page in real time.
When you are finished, be sure to click the Apply button on the top right to save your work.
Review Credits in MineralTree
Credit information in MineralTree can be found in several different places.
View Credits: Invoices tab
On the Invoice tab, hover over the "i" information icon to see Credits Available and Credits Applied.
View Credits: Vendor Details
On the Vendor Details, view Credits Available.
View Credits: Invoice Details
On the Invoice Details page, view Credits Available and Credits Applied.
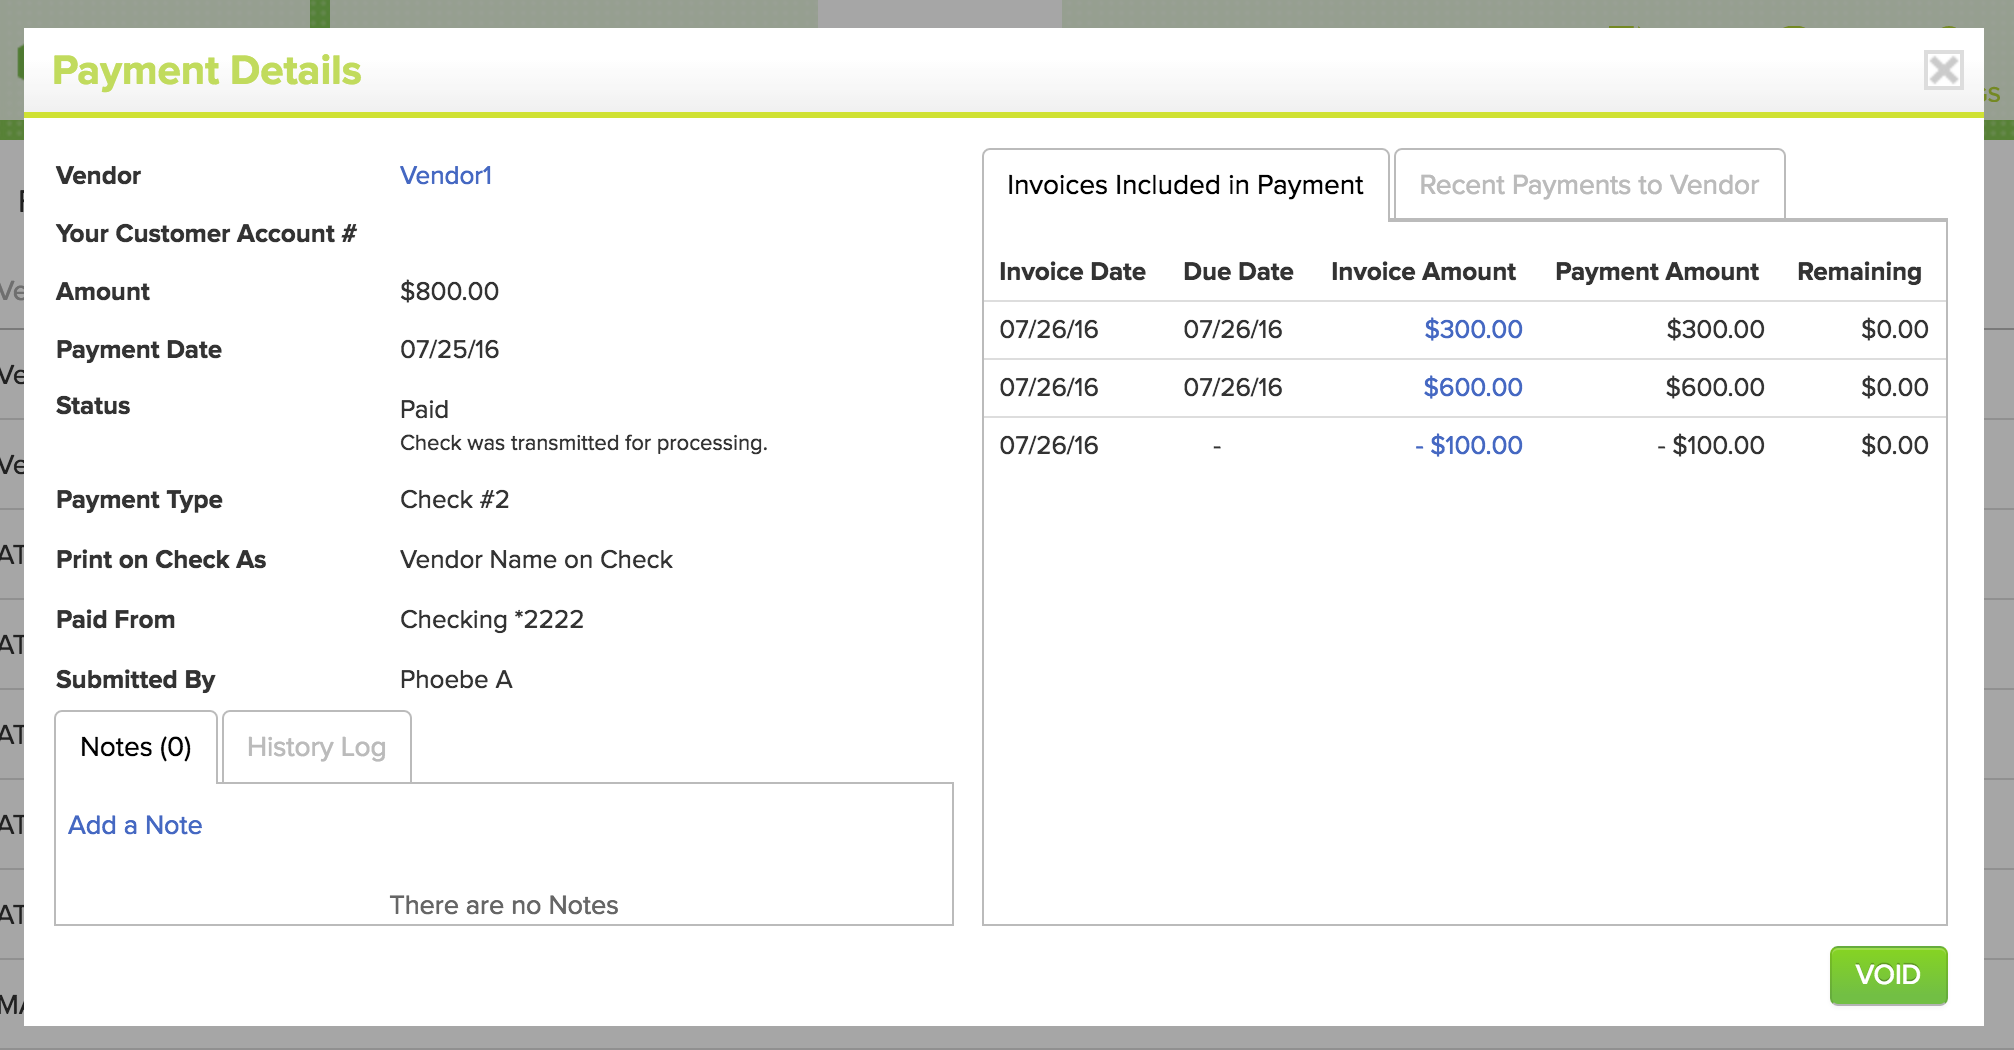
View Credits: Payment Details
Payment Details reflect both the invoices and applied credits included in the payment.
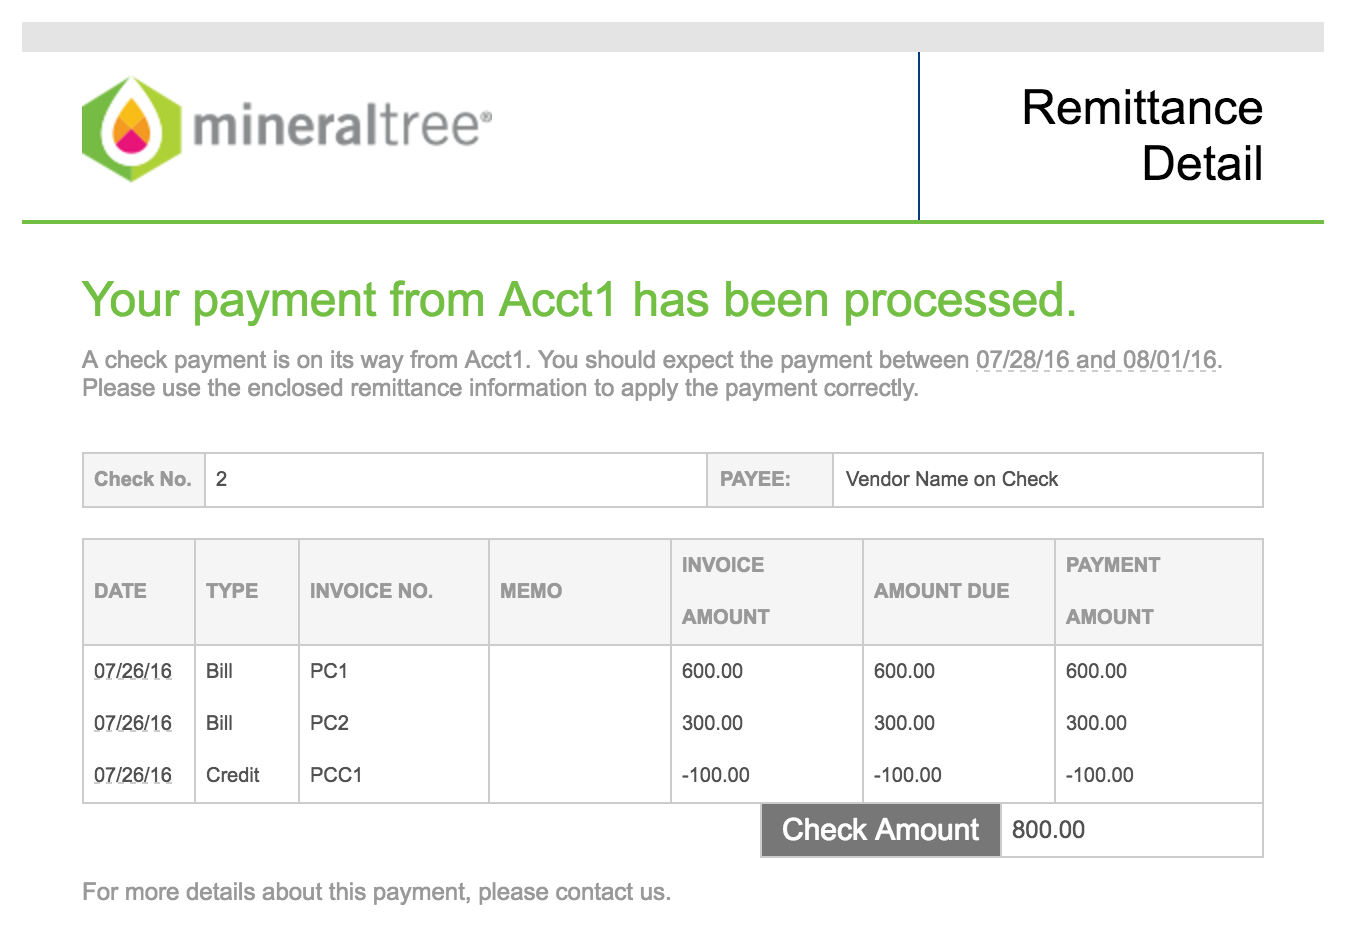
View Credits: Vendor Remittance
Credit applications are automatically reflected in the vendor remittance email and on the check stub when invoices are paid.
When Remaining Balance Is Greater Than $0
If there is a remaining balance greater than $0.00, the following will occur:
- The remaining amount will update and display on the Invoice tab / Search page in MineralTree.
- The remaining balance can be paid in MineralTree on the Invoices tab.
- The "i" bubble will show the original amount when hovering with mouse on the Invoices tab.
-
Information about the credit(s) applied to bills will be included on the check stub and email remittance for the payment.
When Credits Make Your Invoice $0
In some instances, an invoice can be fully covered by credit(s) and brought to $0 remaining balance. If your setting in MineralTree for "Allow $0 Amount Invoices to be Paid" is:
- Disabled - The invoice is closed out and removed entirely from the MineralTree Invoices page.
-
Enabled - $0 invoices can be viewed on the MineralTree Invoices page. These $0 invoices can be added to the Selected Payments queue. MineralTree will not send out an actual payment, but once the $0 Invoice is submitted and/or authorized for "Payment", your vendor will be emailed a remittance indicating the credit has been applied.
To enable or disable the "Allow $0 Amount Invoices to be Paid" setting, please contact MineralTree Support.
The steps below outline the process of fully "paying" an invoice by credit.
- Create and apply credits in the Accounting System.
-
After credits are applied in the Accounting System, they sync to MineralTree, and invoice amount updates to $0.
- Add $0 invoices to the Selected Payments queue. Click Confirm Payment.
-
Payment Amount is $0. Payment Type is Credit Only. Click Submit Payments.
Note: Payment Authorization is not required for payments $0.00 or less.
-
An email remittance is sent to the vendor's remittance email(s) found on the MineralTree Vendor Details page.
Note: Credits cannot be unapplied in MineralTree at this time. In addition, credit deletion does not sync. If you apply a credit to the wrong invoice or you delete a credit in your Accounting System that exists in MineralTree, the credit can be deleted out of MineralTree if it hasn't already been applied to an invoice in MineralTree. Please refer to Deleting Invalid Credits in MineralTree for more information.
Credits need to be applied before you move the invoices to the Selected Payments queue. MineralTree does not sync invoice modifications, including credit application or unapplication, once in the invoice is in the Selected Payments queue. If an invoice added to the Selected Payments queue or submitted for payment needs to be modified, please reference the Recall and Resubmit a Payment article.
Additional Resources
How to Create Credits in Quickbooks Online
How to Create Credits in NetSuite
Please reach out to Customer Support with any questions:
- Phone: 855‑672‑9669
- Email: mtsupport@mineraltree.com